Windows के लिए SplitCam install करते ही अपना virtual audio device register कर लेता है. Audio Mixer में आप जो कुछ balance करते हैं वह पहले की तरह आपके stream में जाता रहता है, और वही session Windows के सामने एक input device की तरह रखा जाता है — यानी कोई call, कोई recorder या कोई browser tab, आम microphone list में SplitCam चुनकर ही उसे सुन सकता है.
SplitCam हमेशा से audio जोड़ पाता रहा है: Audio Mixer वह जगह है जहाँ एक microphone, एक music playlist, एक browser page और खुद Windows की निकाली हुई आवाज़ आपस में balance होते हैं, और वही balance आपके broadcast और आपकी recording में जाता है. Virtual microphone इनमें से कुछ भी नहीं बदलता. यह उसी session के लिए एक दूसरा, समानांतर ठिकाना है — SplitCam इसे Windows के सामने एक input device की तरह रखता है, और microphones की list दिखाने वाला कोई भी program इस पर आ सकता है. Mixer तय करता है कि SplitCam कैसा सुनाई देगा. Virtual microphone तय करता है कि उसे और कौन सुन पाएगा.
A strip per source, each with its own volume, mute and monitoring. Noise suppression on the microphone, and filters that belong to the individual source: VST plug-ins, Delay, Sound Offset and the Audio Compressor.
An audio input registered with Windows, sitting in the same list as your sound card and your headset. Programs do not integrate with it one by one; they enumerate the inputs Windows reports, and this is one of them.
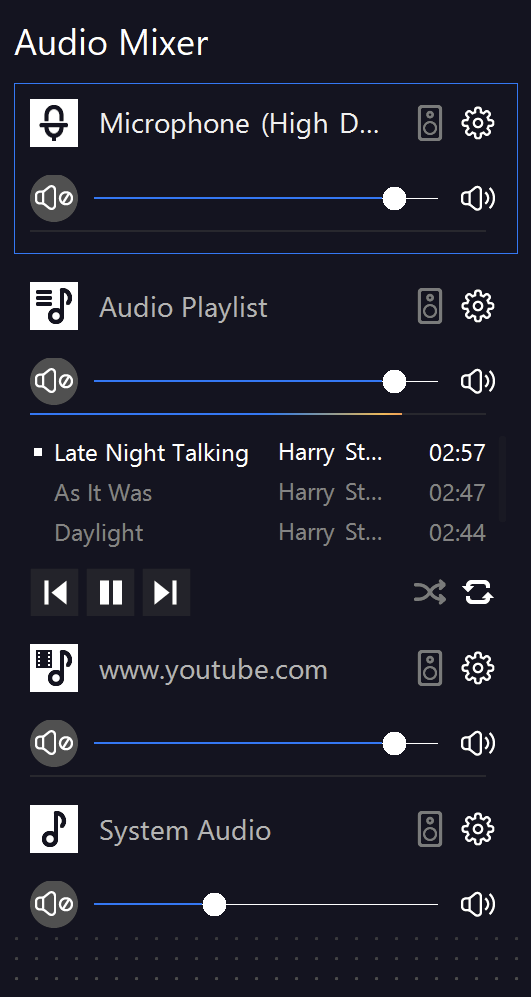
Mixer panel में हर source के लिए एक strip होती है. बगल में दिख रहा capture एक live session है, जिसमें ऐसी चार strips हैं: वह microphone जिसे Windows एक High Definition Audio Device बताता है, अपनी track list और transport controls वाली एक Audio Playlist, एक browser page — यहाँ www.youtube.com — और System Audio, यानी खुद Windows की निकाली हुई आवाज़.
हर strip पर एक mute button, एक volume slider, एक monitoring toggle और filters के लिए एक gear होता है. इस session में microphone, playlist और browser तीनों ऊपर हैं, जबकि System Audio काफ़ी नीचे खींचा हुआ है — यह आम बात है, क्योंकि notification की आवाज़ें और app के beeps आवाज़ के बराबर नहीं, उसके नीचे रहने चाहिए. यह panel मिलकर जो बनाता है वही broadcast में जाता है, और वही session virtual microphone उपलब्ध कराता है.
लेने वाले सिरे पर न कोई integration बिठानी है, न कोई plug-in जोड़ना है. Program वही input list खोलता है जो Windows उसे देता है, और SplitCam device उसी list में hardware के बगल में होता है.
A conference program gives you one input and no way to add a second track to it. Selecting SplitCam turns that single input into everything you have balanced — the voice, the clip you are reacting to, the page you are demonstrating.
Anything that records from a microphone can capture the assembled session instead of just the room, which keeps a walkthrough and its sound in one file rather than two that have to be lined up afterwards.
Web apps ask the browser for a microphone and get the same Windows list. A recording page, a web meeting or a voice widget can take the SplitCam device without installing anything.
If you also run OBS or a similar tool, it can add the SplitCam device as an audio input capture and treat the assembled sound as a single source instead of rebuilding the same routing twice.
यह device खुद Windows में register होता है, एक-एक program में नहीं. कोई program अपने input को जो भी कहे — microphone, audio device, recording device — पढ़ता वह Windows की रखी हुई list ही है, और उसी list में आपके sound card के बगल में SplitCam की entry होती है. बस इतनी ही शर्त है: एक input selector.
Setup, application के साथ ही audio device को register कर देता है. Windows पर अलग से कोई driver package लाने की ज़रूरत नहीं, और SplitCam uninstall करते ही यह device भी चला जाता है.
Audio sources Add new source layer menu के Audio Source submenu से जोड़े जाते हैं, और फिर mixer में balance किए जाते हैं. हर level set करें, जो नहीं चाहिए उसे mute करें, और ज़रूरत हो तो हर source पर अलग filters लगाएँ.
दूसरे program में input या microphone list खोलें और अपने hardware की जगह SplitCam audio device चुनें. अगर वह list SplitCam install होने से पहले बनी थी, तो उस program की audio settings दोबारा खोलें, ताकि वह Windows की दी हुई list फिर से पढ़ ले.
यह device क्या है, और क्या नहीं.
नहीं. Audio device को SplitCam का अपना setup ही register करता है, इसलिए Windows के लिए SplitCam install कर लेना ही पूरा काम है. अलग से कोई package लाने की ज़रूरत नहीं.
Audio Mixer वह जगह है जहाँ आप SplitCam के अंदर sources को जोड़ते हैं, और वही जोड़ आपके stream और आपकी recording में जाता है. Virtual microphone उसी session का एक अतिरिक्त output है: यह उस आवाज़ को Windows के सामने एक input device की तरह रख देता है, ताकि जो program SplitCam के बारे में कुछ नहीं जानता, वह भी उसे चुनकर सुन सके.
हर वह program जो आपको microphone या audio input चुनने देता है. यह Windows की input list में आपके sound card के बगल में दिखता है, इसलिए call apps, recorders, browsers और OBS — सब इस तक एक ही तरह पहुँचते हैं.
नहीं. आपका stream और आपकी recording पहले की तरह ही mixer से audio लेते रहते हैं. Virtual microphone एक अतिरिक्त सुनने वाला है, कोई replacement नहीं.
SplitCam startup पर देख लेता है कि driver load हुआ या नहीं, और न हुआ हो तो warning दिखाता है; ऐसे में program चलता रहता है, पर device उपलब्ध नहीं होता. अगर कोई warning नहीं आई थी, तो हो सकता है कि लेने वाले program ने अपनी input list SplitCam install होने से पहले बना ली हो — उसकी audio settings दोबारा खोलें.
हाँ. यह किसी add-on की तरह नहीं, बल्कि Windows build का ही हिस्सा है, इसलिए इसमें कुछ भी किसी licence key या account के पीछे नहीं है.
Free download. Windows के लिए SplitCam v10.9.2 — Windows 10 और 11, 64-bit.